
You must be familiar with toilet flanges if you’re a homeowner. But in case you haven’t, this part is set at the surface of the toilet drain pipe and assists in securing the toilet to the bathroom floor. These rounded parts are built from metal, rubber, or PVC. Bolts help to keep them in place. Toilet flanges that become loose or worn out can leak, resulting in future damage. You will need to learn how to replace a toilet flange if you have this problem in your home.
Contact Eco pro plumbing if you find DIYs difficult or do not possess the equipment. They will send in the best plumbers in Cambridge Ontario. They also offer the best toilet repair plumber.
Bring out the Necessary Supplies and Equipment.
Ensure you have the following items close before learning how to repair a toilet flange. You can get a brand-new toilet flange from your neighborhood store. But remember to bring your existing toilet flange because this will enable you to select the best alternative for your toilet.
- Bolts for the Toilet Flange: Get some bolts to attach to your new flange. You should replace the old one since it might be rusted or worn out.
- Wax Ring: This item secures the toilet’s flange to the base.
- Wrench: You will need this tool to remove the existing bolts from the toilet flange. You can also use them to eliminate the ones around the flange. Pick a multi-bit screwdriver to unscrew the screws holding the flushing toilet together.
- Putty Knife: Use this tool to remove old wax from the flange seal.
Steps to replace a toilet flange
- Take the Toilet Out
Disconnect the water supply from the toilet. Close the knob on the back of your device to accomplish this. Then flush the toilet multiple times to empty the tank. Remove the hose that delivers water to your toilet before starting the replacement process. Next, prepare a sizable open container or have some towels on standby to collect any potential leaks. It would help if you used a newspaper or a tarp to cover the bathroom floor.
- With a Rag, Block the Outflow Pipe.
To stop your bathroom from smelling unpleasant, firmly place a rag inside the pipe. So that you can remove it quickly, don’t stuff it too far into the pipe. Alternatively, you can cease the pipe as soon as you remove the old flange. But stopping it here may prevent small objects like nuts and screws from falling into the pipe.
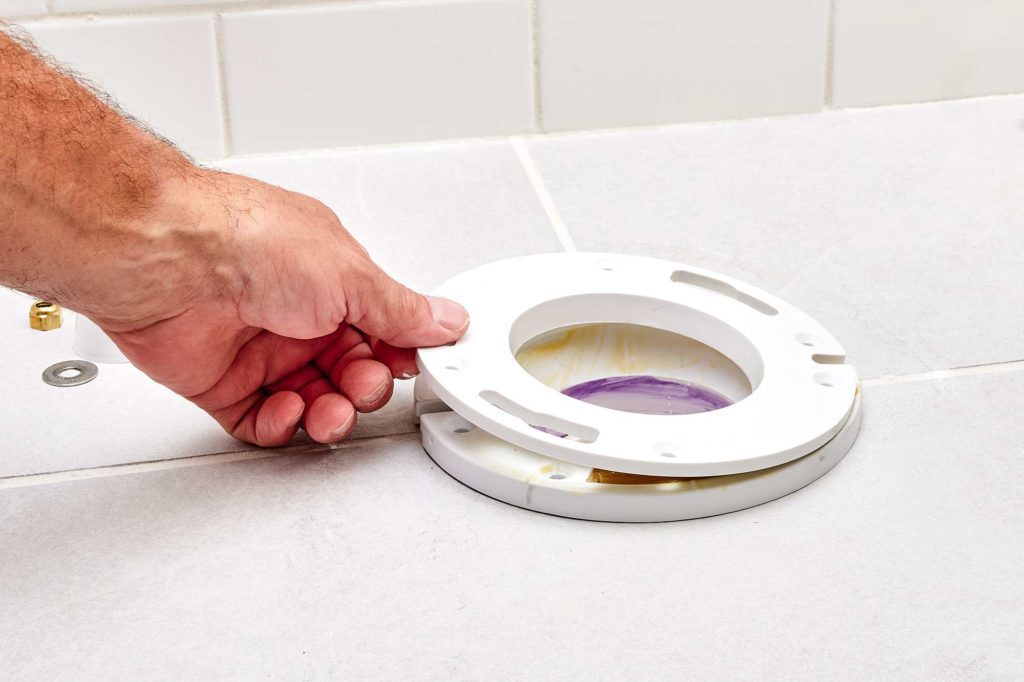
- Examine and clean the Toilet Flange.
Look for the toilet’s faulty wax ring. Here, it secures the joint between your toilet’s base and flange. If you see it, scrape it off with a putty knife. Wax particles will attach to the knife as you work. Wipe your instrument with some old newspaper or a towel to get rid of them. Turn your attention to the screws holding the flange to the bathroom floor. Loosen them, then store them away for future use. These serve as last-resort replacement screws in case the ones included in your flange kit miss.
- Install The New Flange
The new flange should now have the bolts in it. You should remove the bolt’s nut and washer. Place two bolts in their corresponding holes and place these items across from one another. Use the bolts from the prior flange if they are in fine condition. Connect the outflow pipe with the new flange. While the flange’s neck should tightly fit into the pipe, try to let it rest on the ground.
- Establish The New Flange
The bathroom floor and flange lip should both obtain the screws. To fasten screws into the pre-drilled holes in the flange rim:
- Drive the tool into the screws.
- When spinning the tool, move it in a clockwise direction.
- Create new pilot holes with a drill if the previous ones are damaged.
- Tap plastic wall anchors into the holes with a mallet if you also find that the new screws won’t fit in them.
- Install the Toilet
On the flange, place the toilet. Place the holes at their base so the bolts sticking out from the flange will fit into them. Push the toilet firmly down to the rear of the bowl rim as soon as it touches the flange to shape the wax ring and secure the attachment.